Testing plays a key role during the development of an app, and if done properly, can save a lot of time. Manually repeating tests is costly and time consuming, that’s why test automation frameworks were created. Appium is one of the more popular test automation frameworks in the mobile world. It’s an open source framework for use with native, hybrid and mobile web apps and is very well documented.
Appium is a powerful framework that enables you to write tests independently from your app. Tests can be written in Java, Objective-C, JavaScript (Node), PHP, Python, Ruby, C#, Clojure, or Perl with the Selenium WebDriver API and language-specific client libraries.
This blogpost is written by our Android developer Yassin Amhagi
How to use Appium
Appium comes with three tools:
Appium server is a HTTP REST API which is responsible for detecting and interacting with test devices. Appium supports both emulators and real devices. Nowadays Appium it’s integrated into Gitlab CI, AWS, Bitrise and other cloud applications. Using the API you will also be able to completely write your own integration if needed.
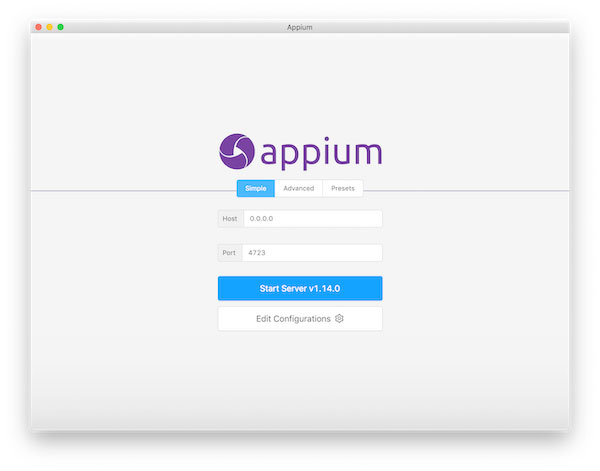
Appium Desktop is an app for Mac, Windows, and Linux which gives you the power of the Appium automation server wrapped in a beautiful and flexible UI.
Appium inspector is a tool that can be used to inspect elements of a mobile app. Whenwriting mobile tests you need to identify UI elements by certain ids and with Appiuminspector you can find those ids without having the source code.
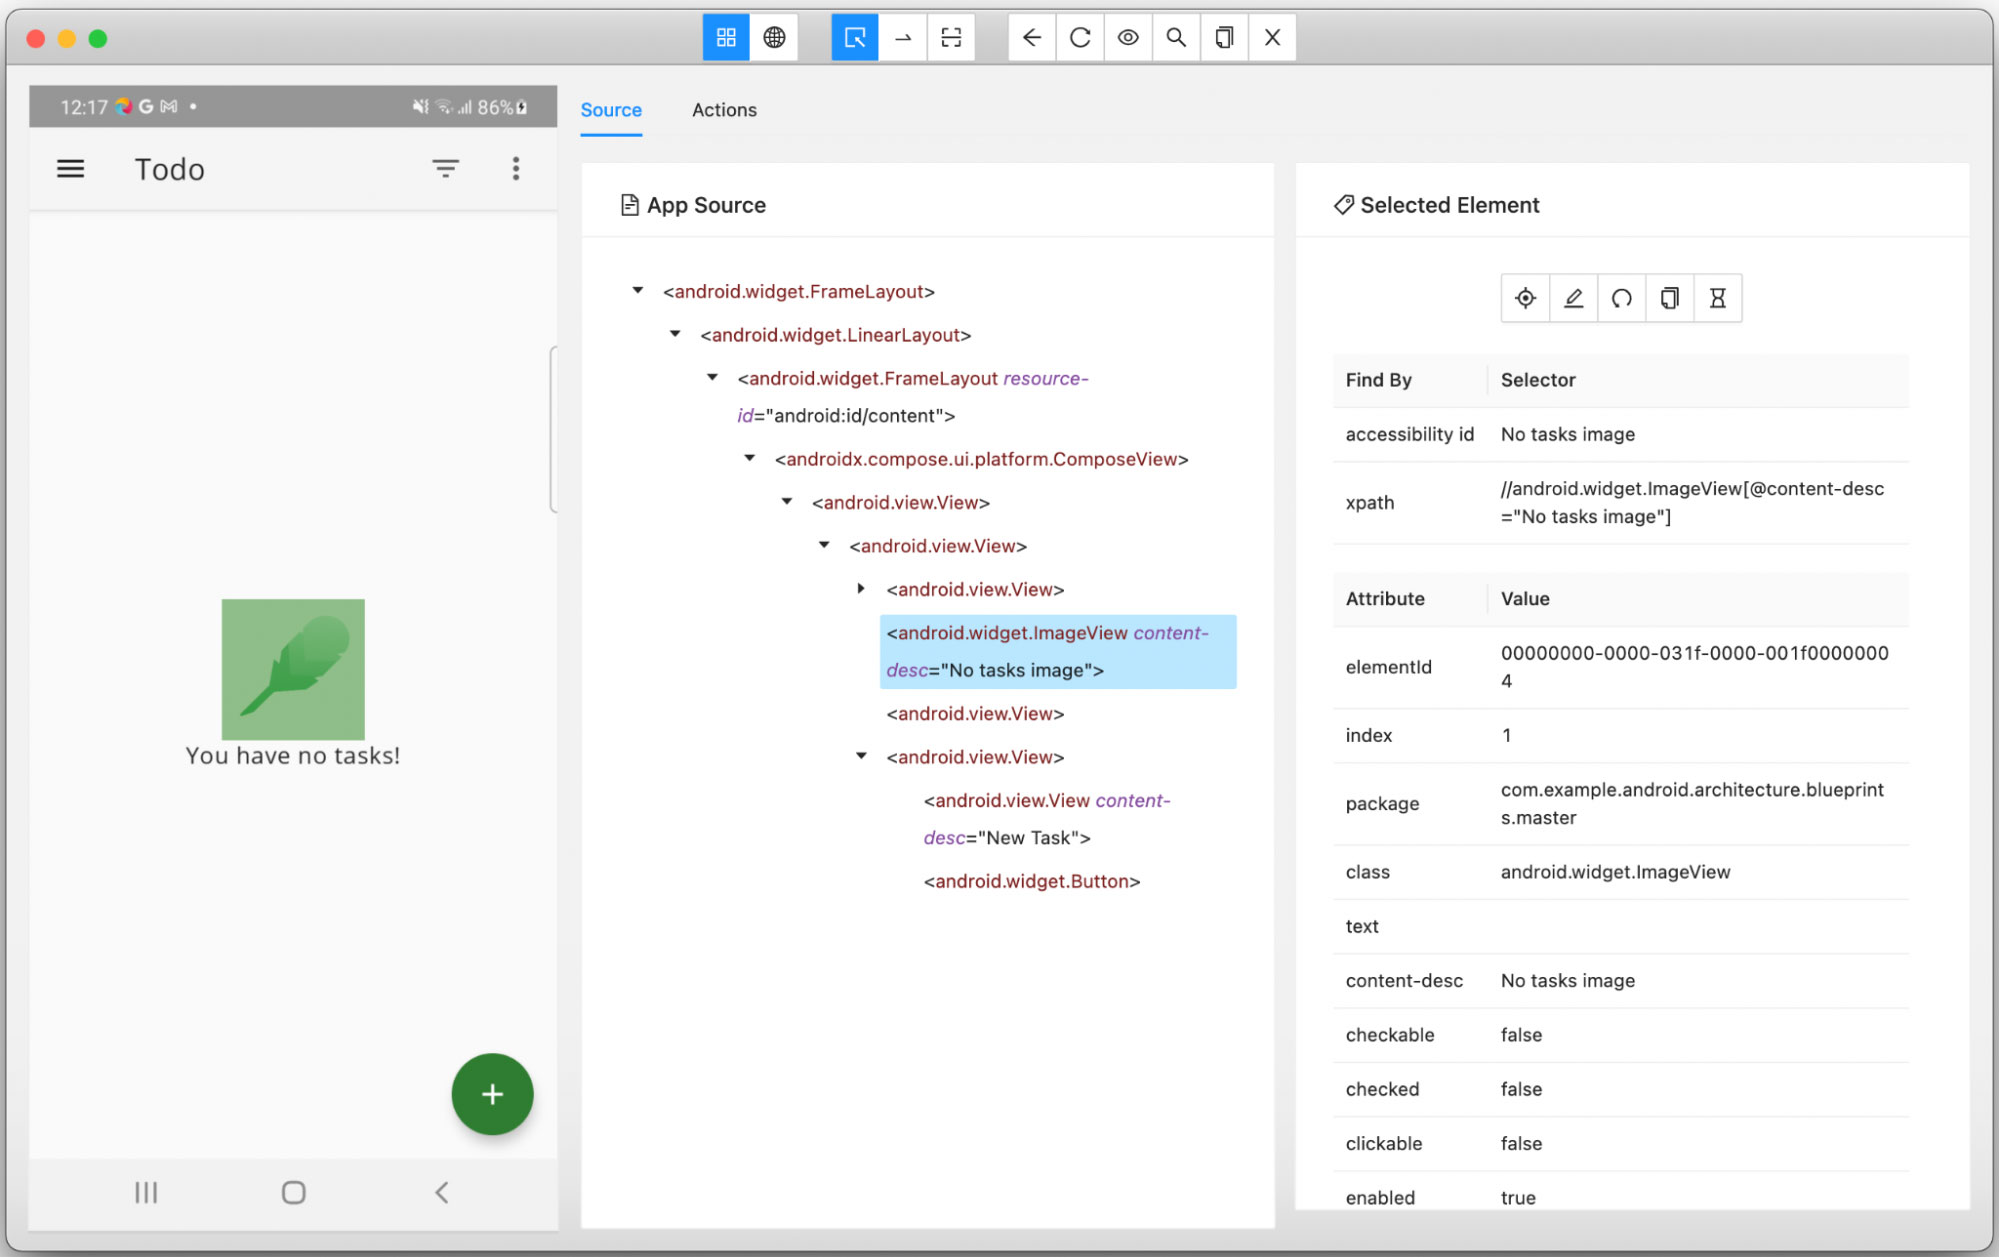
Once the Appium server is running you can interact with its API using one of the previouslymentioned programming languages or using Appium inspector.
Appium Desired Capabilities
Before you can start writing tests, you need to understand the concept of Appium’sDesiredCapabilities. Desired Capabilities is basically aJSON document sent by Appium clients tothe Appium server when a new automation session is requested. The JSON documentspecifies important data about how your test and automation session should work. Likedescribing which device you want to use, which app you want to launch, if it should beuninstalled first etc. Appium pretty much supports most (if not all) emulators/devices andmost browsers. For more information about supportability you can click here.
Android
Let’s say I have an emulator running that simulates a Samsung Galaxy A40. My DesiredCapabilities may look like this:
| { “appium:platformName”: “Android”, “appium:platformVersion”: “11”, “appium:deviceName”: “Samsung Galaxy A40”, “appium:udid”: “******”, “appium:appPackage”: “com.coffeeit.appium_example”, “appium:appActivity”: “com.coffeeit.appium_example.MainActivity”, “appium:noReset”: “false”, “appium:fullReset”: “false” } |
Most of the properties will speak for themselves. You specify the platform data (Android/iOS)of your device and its name and UDID.
Android requires either two properties which define the app package and the app startingactivity (which is also defined in `AndroidManifest.xml` of an Android app), or a path to an APK file.
| { … “app”: “/path/to/my.apk” … } |
iOS
Real iOS devices have to be provisioned in order to be able to use for testing. A guide onhow to do that can be found here. You should end upwith a JSON that looks like this:
| { “platformName”: “iOS”, “appium:platformVersion”: “15.5”, “appium:deviceName”: “iPhone S6”, “appium:udid”: “******”, “appium:bundleId”: “app_bundle_id”, “appium:xcodeOrgId”: “xcode_org_id”, “appium:appium:noReset”: “false”, “appium:fullReset”: “false”, “appium:xcodeSigningId”: “iPhone Developer”, “appium:updatedWDABundleId”: “io.appium.WebDriverAgentRunner” } |
Instead of the bundle id you can also choose to use the “app” property and refer to an IPA file.
noReset and fullReset
You may be wondering, what are the “noReset” and “fullReset” keys used for? People whojust started to use Appium are always confused about these two properties. Before a testactually starts, Appium gives us the opportunity to clear the app data or to uninstall the app. This will be useful during our tests, for example if we want to test the onboarding of an app.
- If noReset is set to true, all app data will be cleared
- If fullReset is set to true, the app will be uninstalled and reinstalled (this is onlypossible if a path to an APK/IPA is provided)
I personally always clear the app data because you can’t rely on the state of an app. Clearing the app data will give a test higher assurance of passing successfully.
A complete list of capabilities can be found here.
Accessibility ids
When writing tests we have to interact with UI elements. There are different methods to dothis. UI elements are identifiable by:
- Id
- Accessibility id
- xpathThe nested path of an element
- Class nameClass name of the element
- Tag name
- And various other Android/iOS related methods
The best way is to use accessibility ids. Simply because accessibility ids do not require codechanges and can be synchronized between multiple apps. So if you have an Android and aniOS app, depending on how much they differ, you will be able to use the same test for bothapps. Meaning you don’t need to create a separate test for Android and a different one foriOS. Furthermore, you can use if conditions in your code to perform iOS only or Android onlyUI operations.
Writing tests
Now that we understand Appium’s Desired Capabilities and have a basic understanding ofhow we can identify UI elements, we can start writing tests. I will be using Kotlin in thisblogpost. First, we need to import a few dependencies:
| dependencies { implementation(“io.appium:java-client:8.0.0”) implementation(“org.seleniumhq.selenium:selenium-java:4.1.4”) implementation(“org.testng:testng:7.5”) testImplementation(“org.testng:testng:7.5”) } |
For this example I will be testing a simple tasks app that I created. Create a new class in “src/test/kotlin” called “TodoTasksTest” which looks like this:
| import io.appium.java_client.AppiumBy import io.appium.java_client.android.AndroidDriver import org.openqa.selenium.WebDriver import org.openqa.selenium.remote.DesiredCapabilities import org.openqa.selenium.support.ui.ExpectedConditions import org.openqa.selenium.support.ui.WebDriverWait import org.testng.annotations.AfterTest import org.testng.annotations.BeforeTest import org.testng.annotations.Test import java.net.URL import java.time.Durationclass TodoTasksTest {private lateinit var driver: WebDriver private lateinit var waiter: WebDriverWait@BeforeTest fun setup() { // Setup the desired capabilities val capabilities = DesiredCapabilities() capabilities.setCapability(“platformName”, “Android”) capabilities.setCapability(“deviceName”, “Samsung Galaxy A40”) capabilities.setCapability(“platformVersion”, “11”) capabilities.setCapability(“udid”, “******”) capabilities.setCapability(“appPackage”, “com.coffeeit.appium_example”) capabilities.setCapability(“appActivity”, “com.coffeeit.appium_example.MainActivity”) capabilities.setCapability(“noReset”, “false”) capabilities.setCapability(“fullReset”, “false”)driver = AndroidDriver(URL(“http://127.0.0.1:4723/wd/hub”), capabilities) waiter = WebDriverWait(driver, Duration.ofSeconds(10L)) }@Test fun testAddTask() { // wait for the element to be visible and click on it waiter.until( ExpectedConditions.visibilityOfElementLocated( AppiumBy.accessibilityId(“AddTask”) ) ).click()// if accessibility ids are not defined, we can identify elements in different ways val elements = driver.findElements(AppiumBy.className(“android.widget.EditText”)) elements[0].sendKeys(“Some title”) elements[1].sendKeys(“Some description”)// wait for the element to be visible and click on it waiter.until( ExpectedConditions.visibilityOfElementLocated( AppiumBy.accessibilityId(“SaveTask”) ) ).click() }@Test fun testAddTaskBackButton() { // wait for the element to be visible and click on it waiter.until( ExpectedConditions.visibilityOfElementLocated( AppiumBy.accessibilityId(“AddTask”) ) ).click() // wait for the element to be visible and click on it @AfterTest } |
In the example above we start with setting up our capabilities. After that, there are two tests defined. One will add a new task with a title and description. The other one will press on the back button when trying to add a new task. In the last function we terminate the automation session. The longest step here is setting up the capabilities and preparing the test device. The tests themselves take a few seconds.

That’s cool. The next time we want to test something, we start the Appium server, connect our device and run our tests. However, what if I am not a developer? Can I still use Appium to write tests?
TestProject
Appium is a free and open source framework to automate testing as much as possible and it does a pretty good job at it. However, you still need to be a developer in order to write tests.
Besides Appium, there are also commercial test automation frameworks which offer an online environment where you can test apps without the need of being a developer. You can setup test data, applications, record tests, integrate into cloud solutions like Gitlab CI or AWS and more.
In 2015 an open source effort started trying to provide all these premium features to the world for free and in april 2018 a first version of this online test environment was released under the name “TestProject”. TestProject is a free end-to-end test automation platform for web, mobile, and API testing and makes great use of Appium. I was really surprised the first time I saw this because such a platform is normally not free and this is the first one of its kind
that can be used free of charge. Which is amazing!
A few things before we dive into TestProject
TestProject claims to be open source, but only their SDK and plugins are. The online environment is not open source. So we can’t run a local instance of the online environment and this also means that internet access is mandatory in order to use it.
How to use TestProject
Using TestProject is actually very easy. You first have to register an account. After that, login and a setup wizard will pop up. After you have confirmed your email, you will be asked to setup a TestProject agent. This agent is responsible for interacting with your test devices and emulators. It runs an Appium server in the background. After all the steps have been taken, you will end up in the test environment. A test project is automatically created to get you started.
At the top left you can see your project and switch to a different one. All the tabs below it are project related.
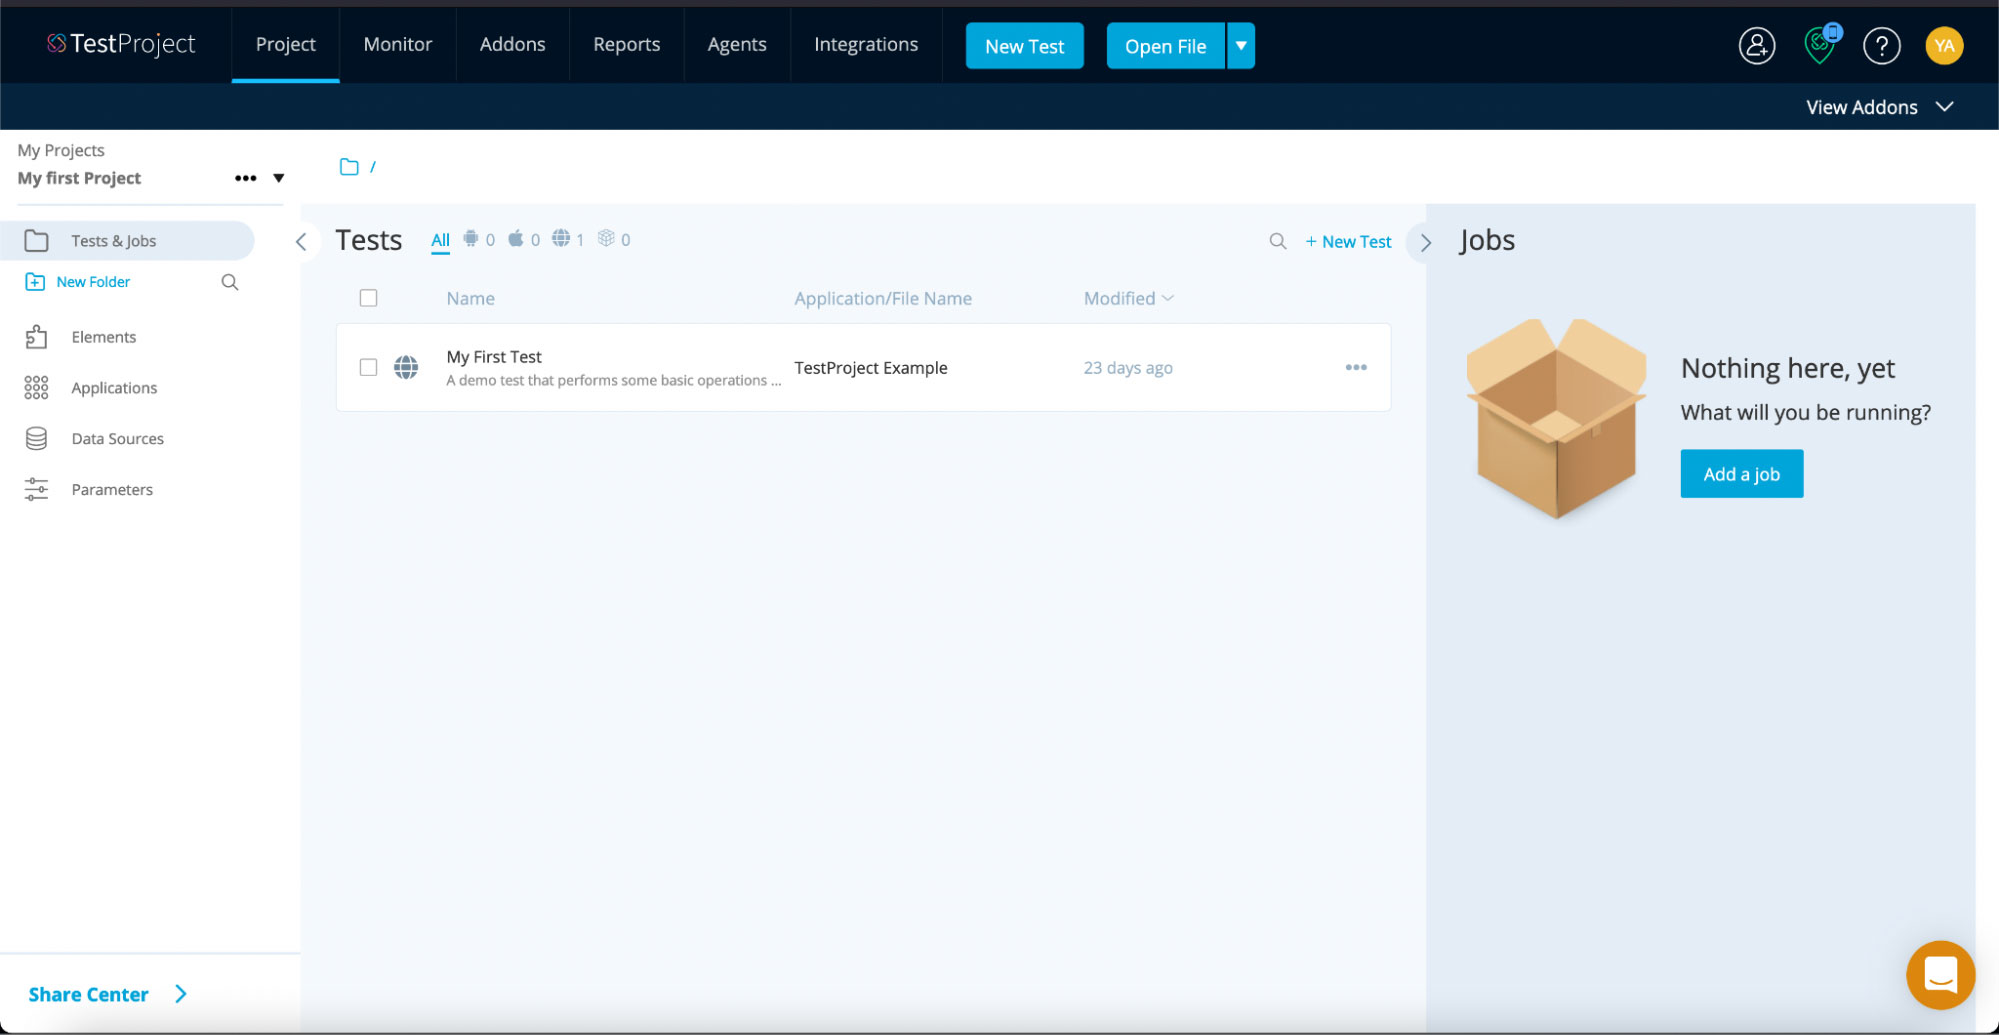
Tests & Jobs
TestProject introduces the idea of tests and jobs, where tests are simply following a flow of steps and jobs are one or multiple tests attached to a specific device. Jobs can be triggered at any moment or even scheduled.
Elements
In the “Elements” tab you can define UI elements which can be used in tests. Pre-defining UI elements will make writing multiple tests more easily because you can then just reference them in a test.
Applications
In the “Applications” tab you can define the applications you want to test.
Data sources
TestProject offers to store data sources (like a CSV file) which can be used in tests, paving the way for Data Driven Tests and Jobs.
Parameters
In the “Parameters” tab you can define key/value parameters which can be used throughout your tests. This can be test data, like login credentials. Pre-defining these makes it easy to re-use them in other tests.
Devices
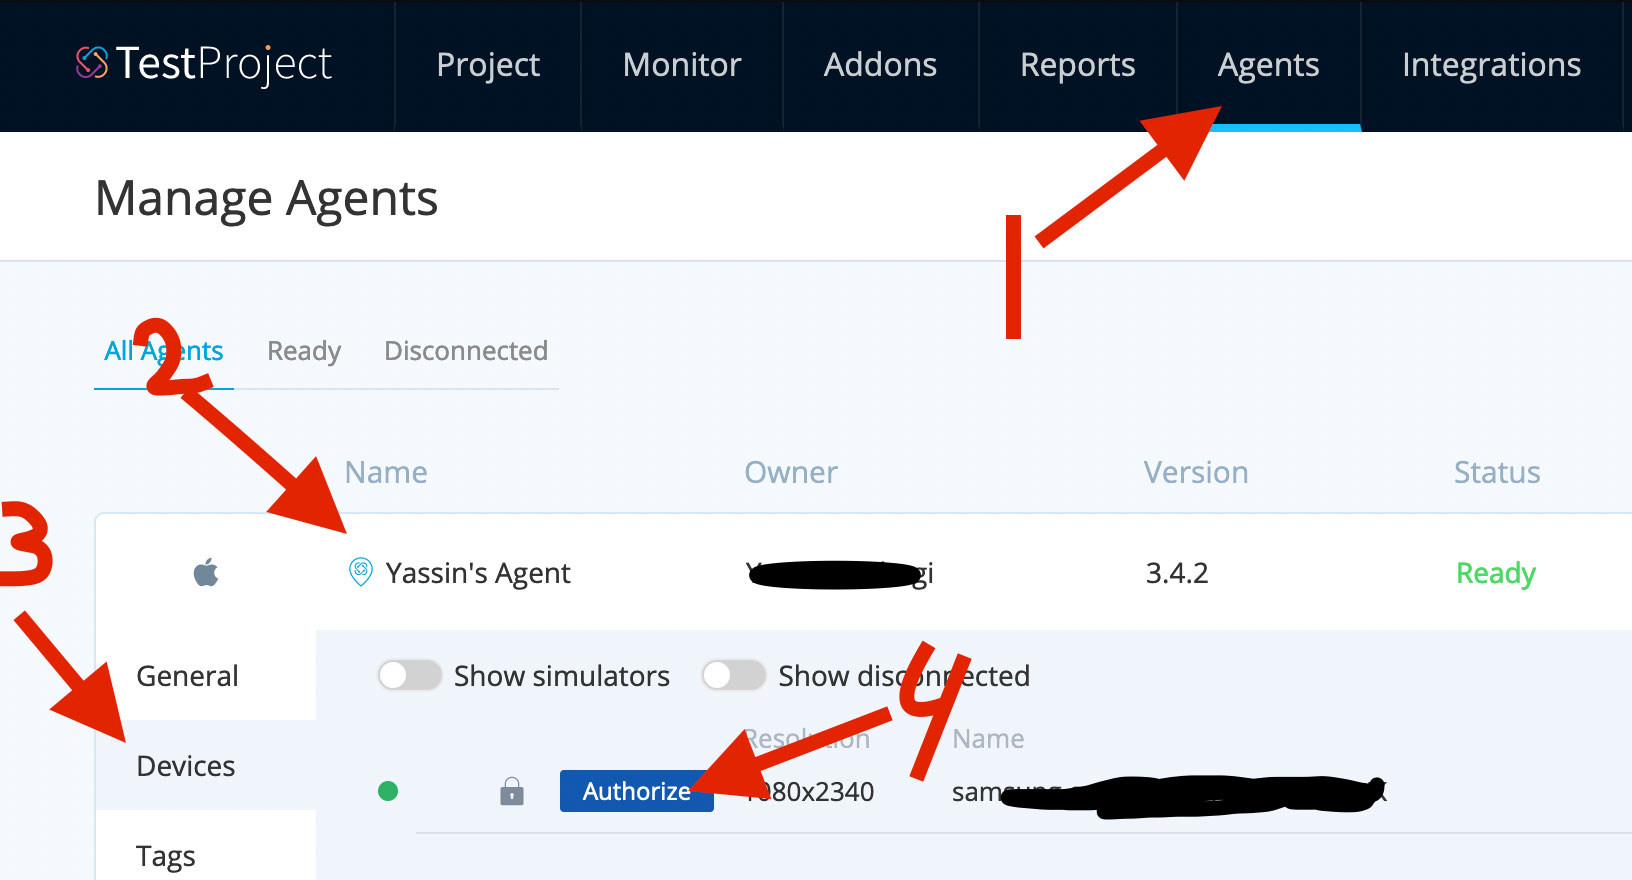
Before you can use test devices in TestProject, you need to authorize them. When an agent recognizes a new device, such a popup will be shown. But if you’re not logged in, you need to go to Agents -> your agent -> Devices -> your device -> Authorize.
Tests
When we open a test, all information about the test shows up like this:
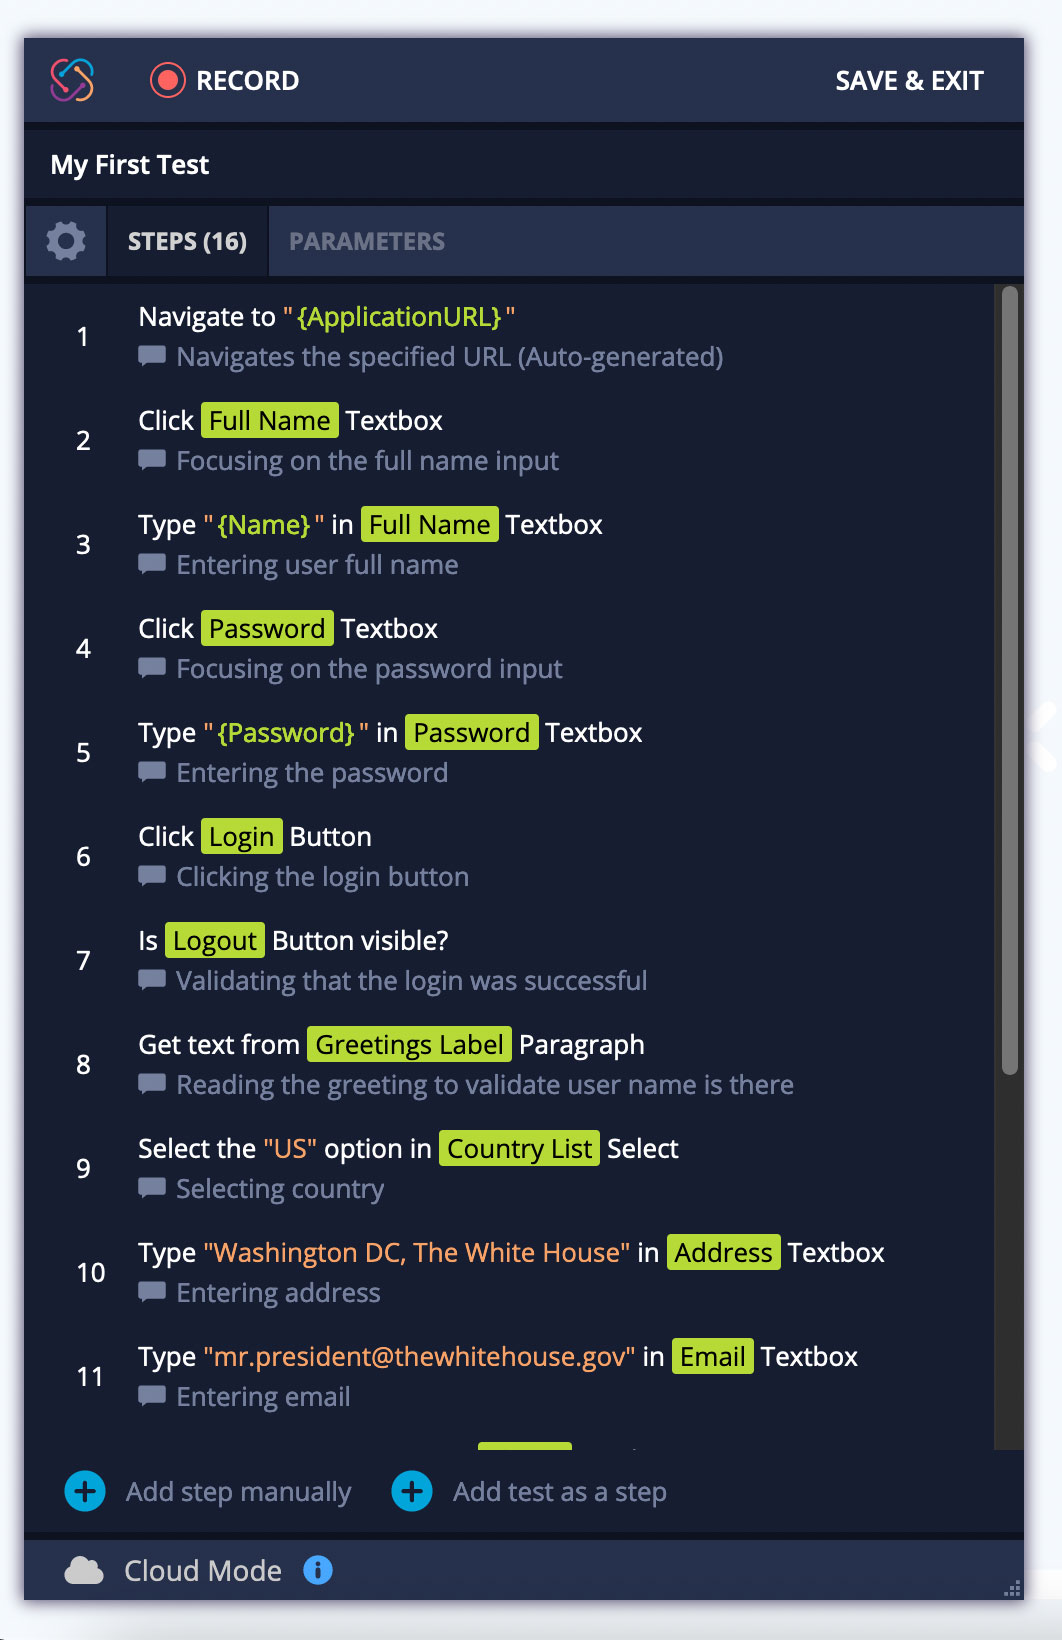
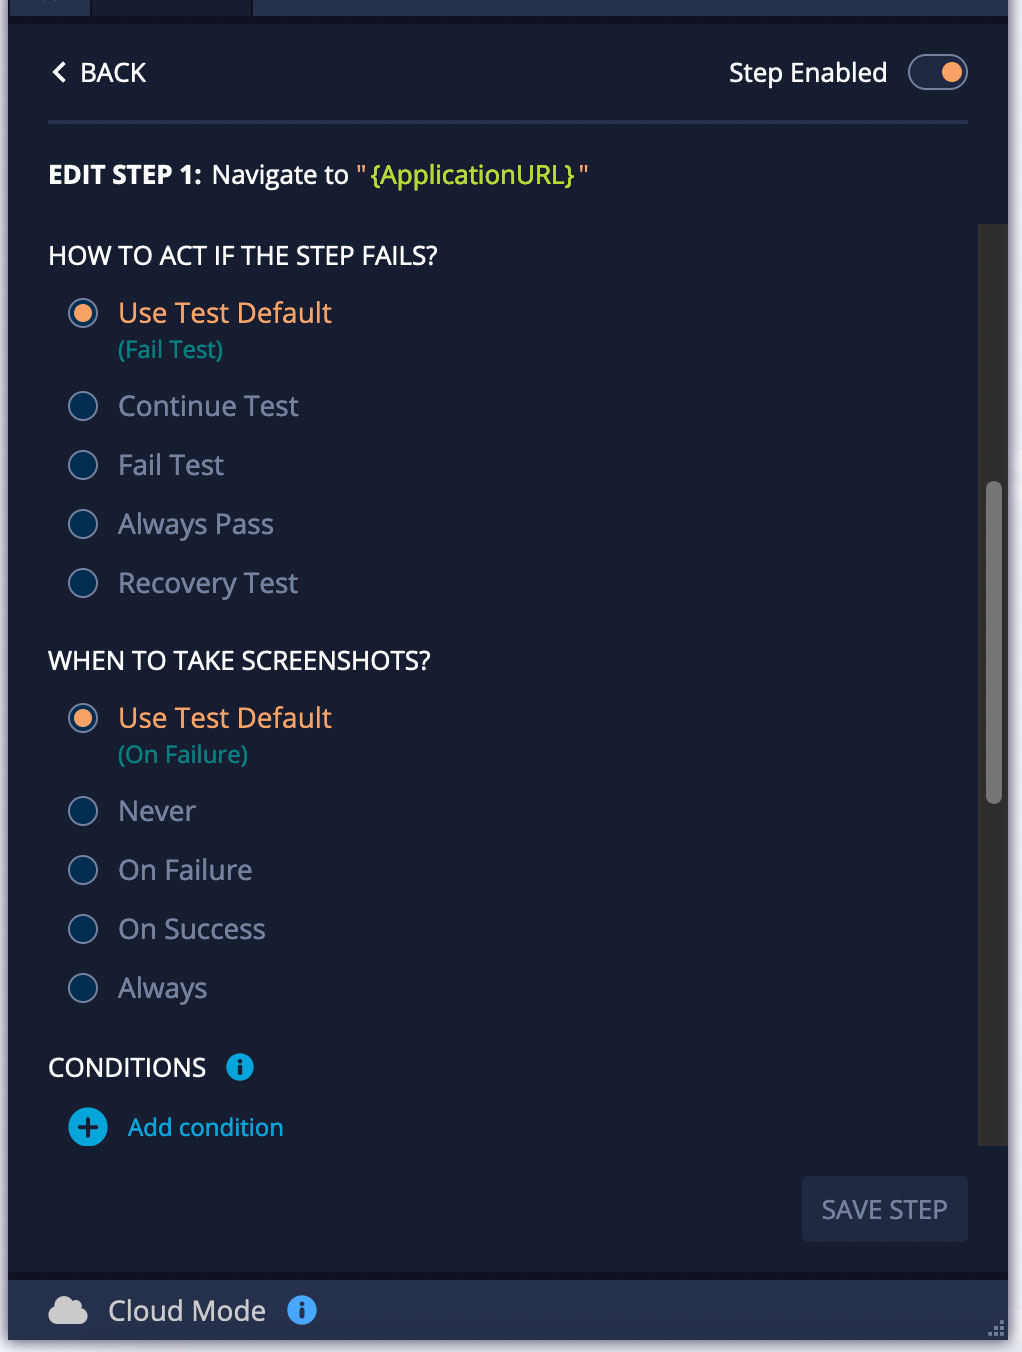
In TestProject we can record steps. This requires a local TestProject agent to be running. Steps can also be created manually. At the top left there’s a gear icon, which exposes the settings of the test. Here we can define how fast the test should be executed, what should happen if a step fails, if screenshots need to be taken during each step etc. So those settings are set on test level and thus apply to all steps. However, TestProject also allows to set these settings on step level. Just open a step and expand the advanced options:
In the parameters tab you can define parameters. These are parameters on test level (and thus can only be used inside the test). The parameters I previously explained are parameters on project level (and thus can be used throughout the project).
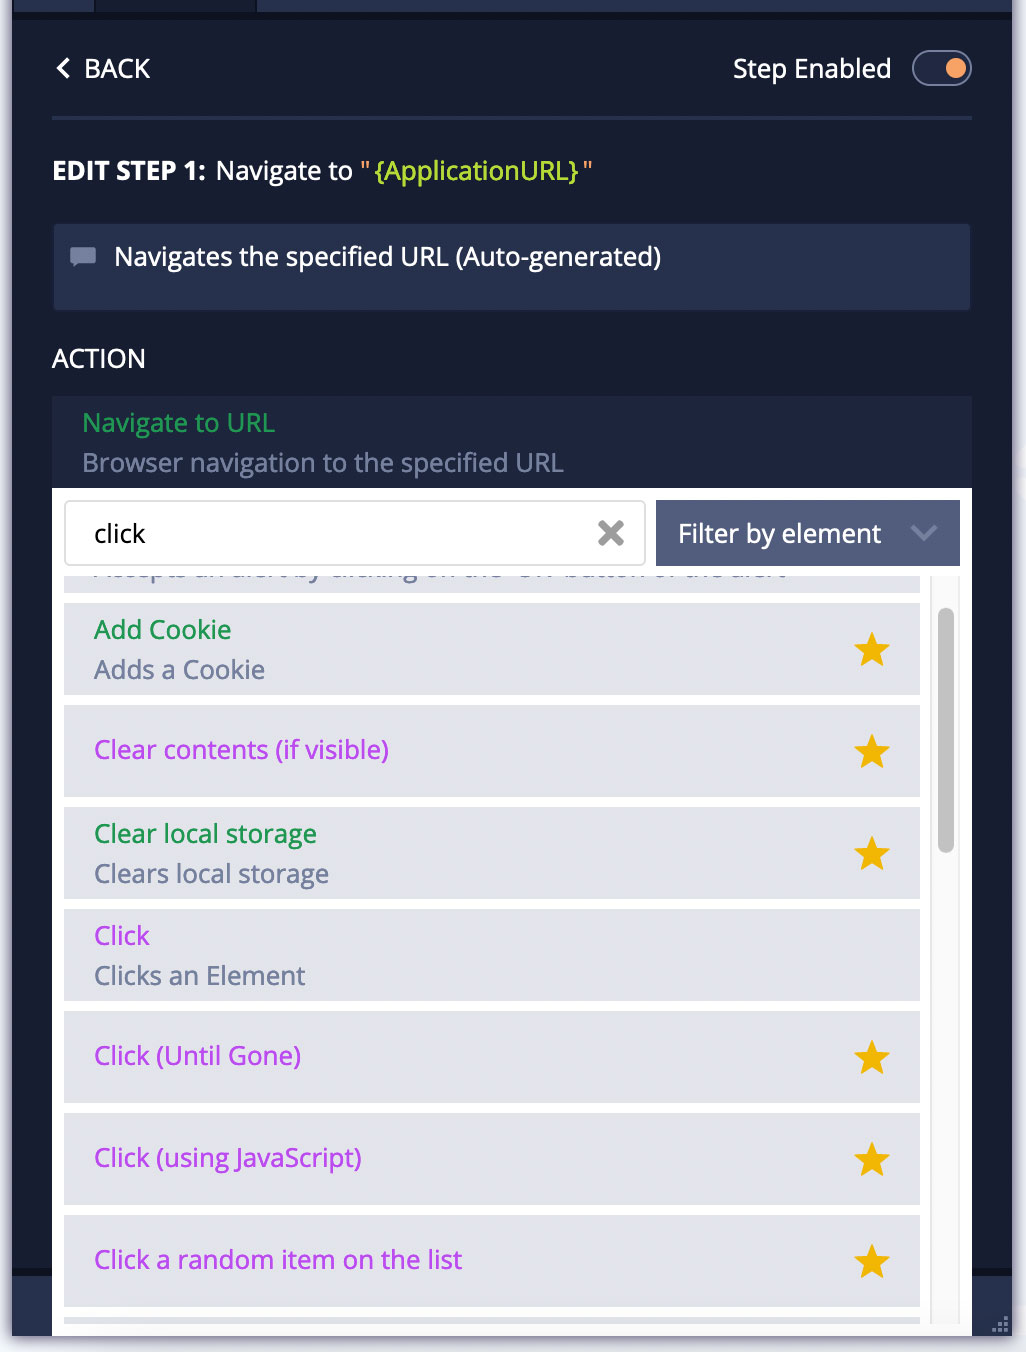
Steps
Each step in a test has an action that needs to be performed. TestProject offers a wide range of options which you can use. TestProject also provides so-called “Add-ons” which you can install and use. Add-ons are very useful, for example when you need to interact with native UI elements (so outside an app). Add-ons can be created by anyone!
Reports
One of the most amazing things I find about TestProject are the beautiful reports it can generate. In TestProject you can generate test reports which will explain the test in detail. From which test data it is using to the actions that will be performed and more.
TestProject also offers the ability to generate reports after a test or job execution is finished. A summary report looks like this (there is also a full report available):
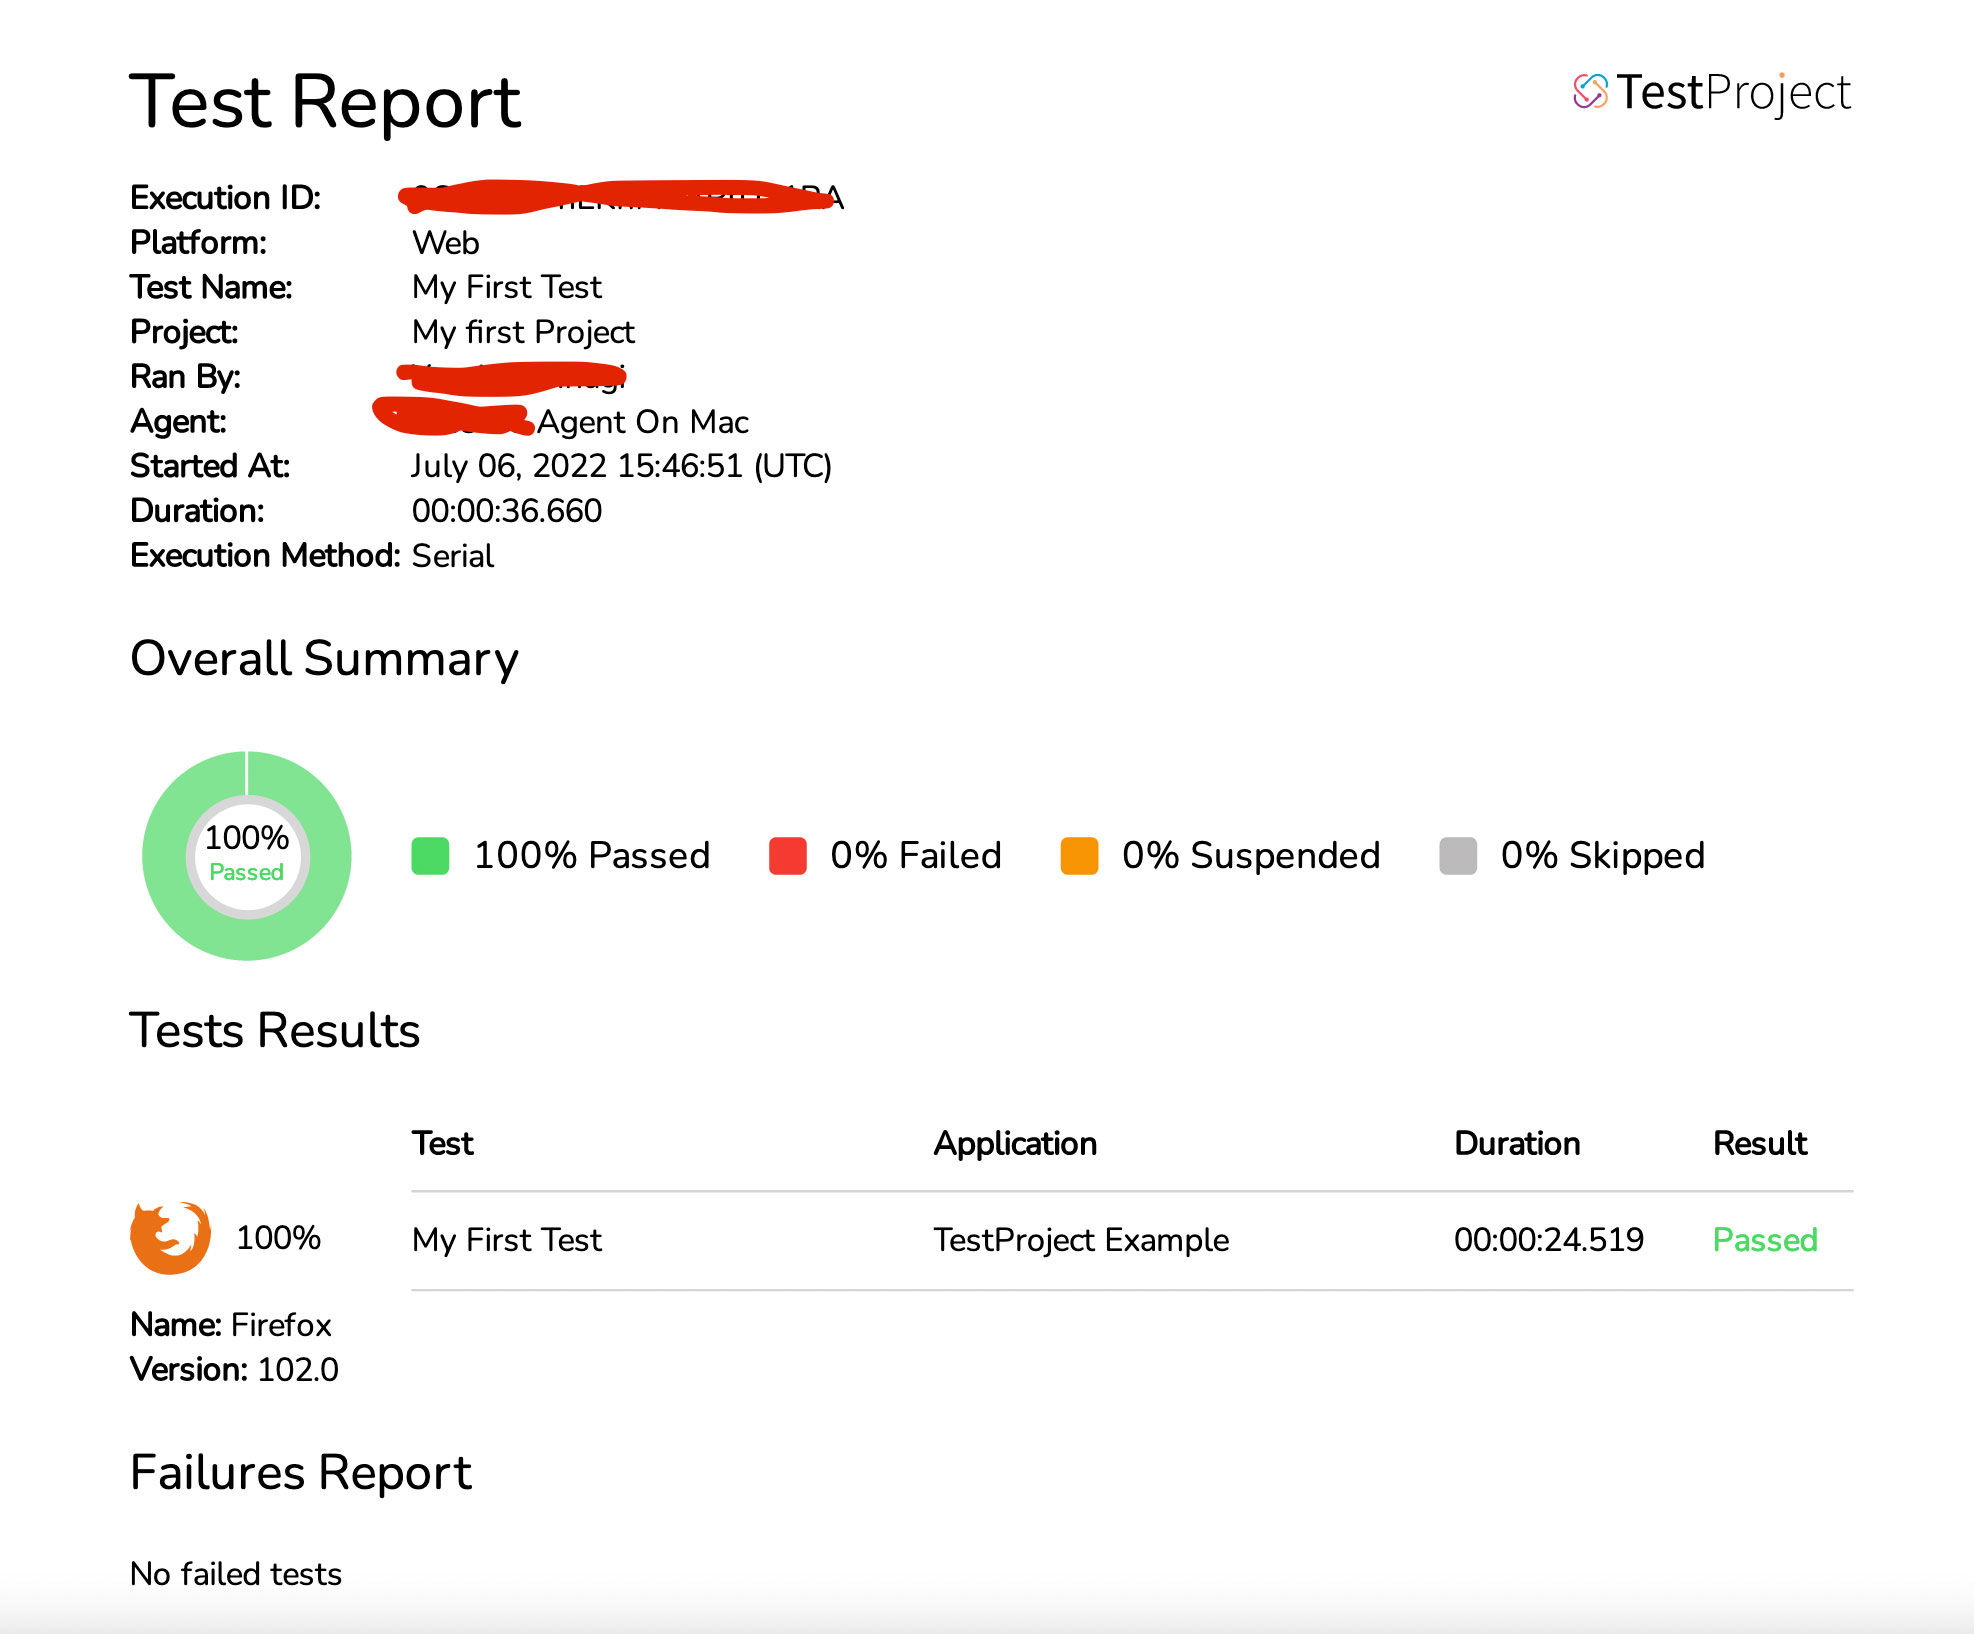
Reports like these can be shared with stakeholders so they know what exactly has been tested, although I recommend sharing the full report. If a test is configured to always take a screenshot of each step, the screenshots will be linked in the full report.
Integration
TestProject can integrate into Sauce Labs and Browserstack. It also offers to define webhooks that notify you when tests succeed or fail.
TestProject agents can be run inside docker containers. However, the agents running inside Docker currently do not support device recognition.
TestProject has a massive API giving you the ability to trigger tests and jobs very easily. Using their API you can write your own integration if necessary. I’ve written my own Gitlab integration for Android testing. It executes a series of jobs and only exits the pipeline when all jobs have been passed:
| # Minimal OS image with Java and Android 31 build tools pre-installed image: mreichelt/android:31variables: #Colors 😉 Color_Off: ‘\e[0m’ # Text Reset# Regular colors Red: ‘\e[0;31m’ # Red Green: ‘\e[0;32m’ # Green# Bold colors BRed: ‘\e[1;31m’ # Red BGreen: ‘\e[1;32m’ # Green BBlue: ‘\e[1;34m’ # Blue# TestProject variables TP_API_URL: “https://api.testproject.io/v2” TEST_RETRIES: 2# Edit this for different TestProject accounts TP_API_KEY: “SOME_API_KEY”# Edit this for different TestProject projects TP_PROJECT_ID: “some_project_id” TP_APP_ID: “some_app_id” TP_APK_FILE_NAME: “app-debug.apk” TP_JOBS: “job_id_1 job_id_2”before_script: # Install jq for JSON parsing – apt-get –quiet update –yes – apt-get –quiet install jq –yesstages: – build – upload – test # Build project # Upload the APK to TestProject # Execute the defined TestProject jobs |
iOS settings
One small downside to TestProject is the way they handle iOS settings. With Appium, you had to manually provision a real test device. TestProject can handle this for you if you provide the correct iOS settings. Here you can find how to do this. You can find the settings under your profile image:
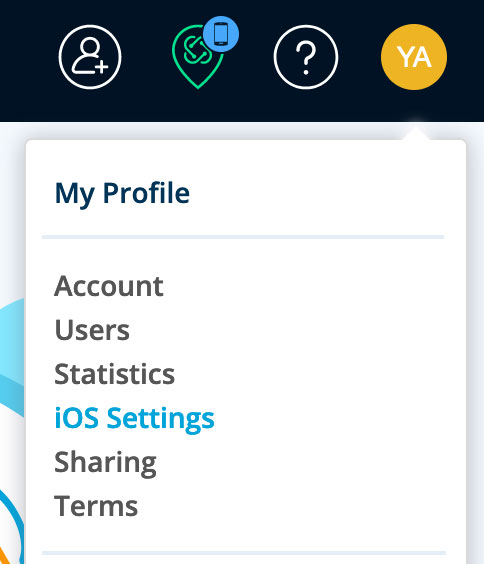
These iOS settings however, have to be defined on account level. So if you have another iOS app with a different team id, you will need to create a new TestProject account which is a bit unfortunate.
Tips and tricks
TestProject contains many functionalities and tricks to make testing easier than ever. There are also a few things to note when using TestProject like:
- Everything you do is stored in the cloud, TestProject offers free 2GB, for more you need to contact them, they use AWS
- You can duplicate tests
- You can share tests among users
- Tests can be saved in files
- A job can contain multiple tests, so you may not always want to reset app data when writing tests
- A project, job, test and anything else has an “id” which you can use in their API
- TestProject agent 3.5.0 contains a bug where resetting app data doesn’t work, use a version before that (3.4.2)
- Add-ons can be developed by anyone using TestProject’s SDK
- TestProject has a forum which you can use to ask questions, but be sure to ensure that the question hasn’t already been answered using a simple search or Google
- I found it very nice to use docker-android to run Android emulators on my dedicated server. You can install adb on your server and connect to the docker emulators using adb connect
- If you don’t like to host testdevices yourself, you should look into Browserstack
Appium vs TestProject
Using Appium is more work than you may expect. Test projects are separated from the app code, which means they have to be put and managed in separate code repositories. This will require time and effort from developers. However, in Appium you will be able to perform complex scenarios more easily and with a single test.
TestProject tries to make as much use of Appium as possible, but because everything is done through a UI there are some limitations. One of them is that when creating a test, you have to specify the platform app. This means in TestProject you can’t use one test for both Android and iOS. You’ll have to duplicate the test and specify the other platform app.
Another limitation is the usage of multiple devices inside a test. TestProject only allows one device to be used in a test. Let’s say we want to test a VoIP application. Testing such an app requires at least two devices (caller and callee). In Appium you can easily do this in one test, but in TestProject you would need to create two jobs and run them at the same time.
These two limitations are the only ones I stumbled upon so far. They’re also important when one would want to migrate from Appium to TestProject.
Summary
Appium keeps playing a key role in the test automation world and new innovations like TestProject pave the way for creating high quality apps where developers are not needed to create UI tests. TestProject’s API enables us to write custom integrations inside workflows to unlock the full potential of TestProject. It’s well documented and backed by a friendly open source community.
Ready to try it out? The journey starts here: https://testproject.io/
Want to join a team of passionate developers? Take a look at our open positions ??
WANT TO SEE MORE OF COFFEE IT? TAKE A LOOK AT OUR SOCIAL MEDIA ACCOUNTS

CONTACT
ANNA EMMANOUIL
Question about the open positions? Don’t wait. Just send me a message!